Using rclone to transfer files to OCI Object Storage
Oracle Cloud Infrastructure (OCI) provides a web based console that can be used to upload files to OCI object storage but if you have a large number of files to transfer it is easier to use a command line tool. rclone is a command line tool which supports use cases similar to rsync and sftp but in addition to support sftp and local filesystems it also supports cloud based storage systems from a variety of companies including Oracle's Object Storage Service.
This tutorial will quickly walk you through the setups you need to follow to use rclone with OCI object storage.
Disclaimer: I work for Oracle but I don't work in the Oracle Cloud Infrastructure (OCI) group. Opinions expressed here are my own.
Installing rclone
Download rclone for your OS from https://rclone.org/downloads/. Before you configure rclone you'll need to perform some API specific step to setup your credentials.
Creating a bucket
Create a bucket so you can test your configuration in the following sections.
Open the OCI console and naviage to the Object Storage page.
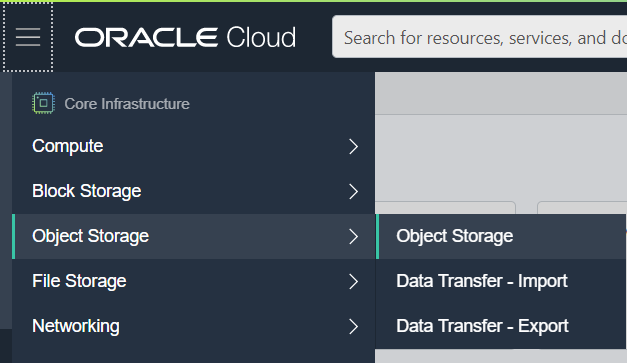 .
.
Press the Create Bucket button and create a bucket named rclone-demo.
Click on the bucket name to open up the bucket details page.
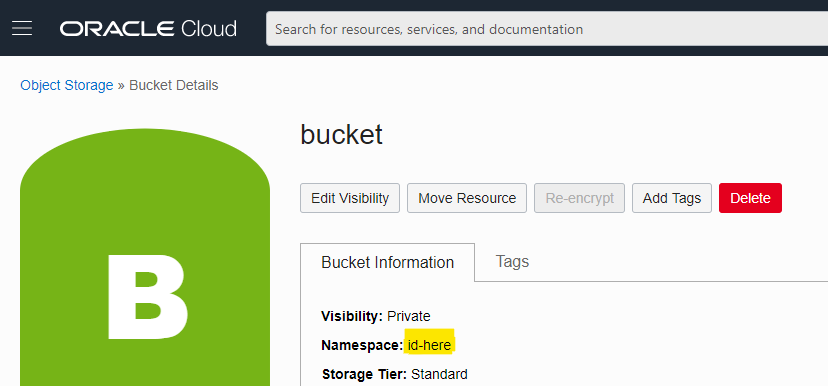
Record the Namespace id value, you'll need it later.
You'll also need to know the region identifier for the region in which you created the bucket. The region identifier can be found in the URL of the OCI console, https://console.{region-identifier}.oraclecloud.com. You can also find a list of region-identifiers at https://docs.cloud.oracle.com/en-us/iaas/Content/General/Concepts/regions.htm but make sure to identify the one containing your bucket.
Using rclone with OCI's S3 Compatible API
OCI's object storage is compatible with most clients that were designed to communicate with Amazon's AWS S3 API. When creating objects in OCI object storage the resulting URL for the objects will be in the following format: https://{object-storage-namespace}.compat.objectstorage.{region}.oraclecloud.com/{bucket}/{filename}.
Setting up S3 Compatible API authentication
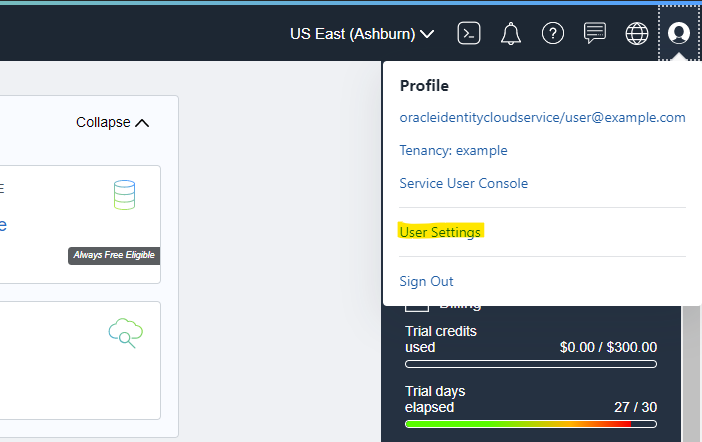
The OCI S3 Compatible API uses Customer Secret Keys instead of your account password. To create one first open your user setting by clicking on the profile icon in the upper right of the OCI console and selecting User Settings.
On the user settings screen, click on the Customer Secret Keys link in the lower-left corner to open the Customer Secret Keys resource pane.

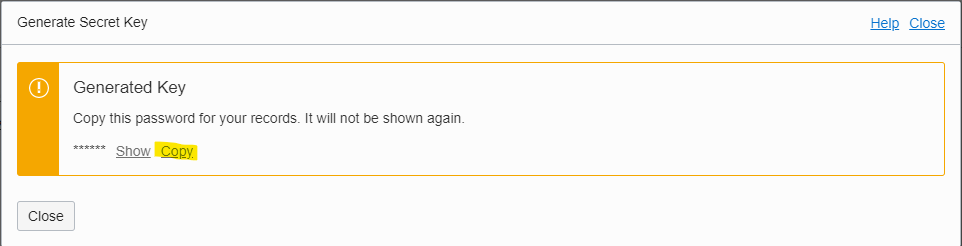
Click on Generate Secret Key button, give your secret key a name such as rclone. In the Generated Key dialog box make sure that you copy the key value and record it somewhere. rclone refers to this value as the secret_access_key and it functions similar to a password. You won't be able to view the value later although you can always delete the key and restart the process.
After creating the key you should see it in your list of Customer Secret Keys. Click on the Access Key for the key you just created and copy the access key value which is different than the secret key value. rclone refers to the access key value as the access_key_id and it functions similar to a user name.
Configuring rclone for the OCI S3 Compatible API
There are 3 primary method of configuring rclone.
- Setting up several environmental variables such as
RCLONE_CONFIG_OCI_TYPEthat rclone would read from. - Running
rclone configand answering a series of questions interactively to create a.config/rclone/rclone.conffile. - Manually creating a
.config/rclone/rclone.conffile in your home directory.
I find option 3 easiest and it also allows you to quickly copy the configuration between system.
Create a .config/rclone/rclone.conf file in your home directory and populate it with the following example, replacing the placeholder text starting and ending with curly braces with the values you recorded earlier.
[oci-s3]
type = s3
env_auth = false
access_key_id = {access_key_id}
secret_access_key = {secret_access_key}
region = {region-identifier}
endpoint = https://{bucket-namespace}.compat.objectstorage.{region-identifier}.oraclecloud.com
At this point everything should be fully configured. Test by listing out your available buckets using rclone.
rclone lsd oci-s3:
If the command doesn't work review the previous steps and repeat as needed.
You could copy the contents of the current direct to your rclone-demo bucket using:
rclone -v copy . oci-s3:rclone-demo
To delete the bucket and all its contents run:
rclone -v purge oci-s3:rclone-demo
Running rclone -v copy . oci-s3:rclone-demo again would recreate the bucket before uploading files to the bucket.
If you have started exploring the Compartment features of OCI, you should be aware that when using S3 API clients such as rclone the buckets that you create will be created in your Amazon S3 Compatibility API Designated Compartment which by default is your root compartment. You can view the current value in the Tenancy Details page under your profile.
Oracle also has a tutorial on using rclone with the S3 compatible API at https://docs.oracle.com/en/solutions/move-data-to-cloud-storage-using-rclone/index.html.
Using rclone with OCI's Swift Storage API
Using the S3 compatible API is the preferred method of accessing OCI object storage but OCI also supports the Swift Storage API.
To confuse the issue slightly, the rclone documentation lists Oracle Cloud Storage under the Swift documention and not the S3 documentation. The rclone documentation is out of date and in the rclone documentation the Oracle Cloud Storage entry refers to the OCI Classic (generation 1) object storage and not the current generation 2 OCI object storage.
rclone's Swift API connector can still be used to access the current generation 2 object storage with some small work arounds. But seriously, just use the S3 connector.
I'm documenting using the Swift connector on the rare chance that someone finds it useful.
When using the Swift API for OCI object storage the URL format will be slightly different - https://swiftobjectstorage.{region}.oraclecloud.com/v1/{object-storage-namespace}/{bucket}/{filename}.
Setting up Swift API authentication
The OCI Swift API uses Auth Tokens instead of your account password or the S3 Customer Secret Keys. To create one first open your user setting by clicking on the profile icon in the upper right of the OCI console and selecting User Settings.
On the user settings screen, click on the Auth Tokens link in the lower-left corner to open the Auth Tokens resource pane.
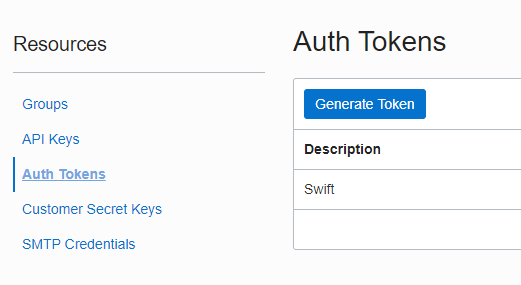
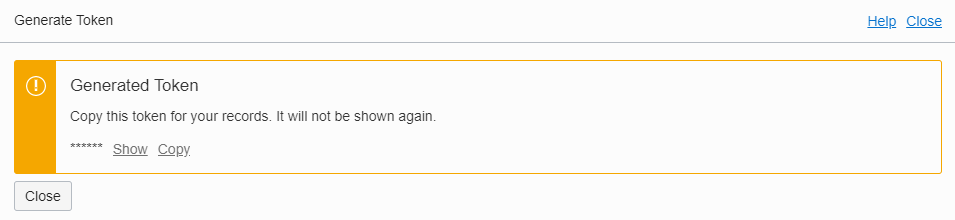
Click on Generate Token button, give your token a description such as Swift. In the Generated Token dialog box make sure that you copy the token value and record it somewhere. The token will function as password. You won't be able to view the value later although you can always delete the token and restart the process.
Configuring rclone for the OCI Swift Storage API
There are 3 primary method of configuring rclone.
- Setting up several environmental variables such as
RCLONE_CONFIG_OCI_TYPEthat rclone would read from. - Running
rclone configand answering a series of questions interactively to create a.config/rclone/rclone.conffile. - Manually creating a
.config/rclone/rclone.conffile in your home directory.
I find option 3 easiest and it also allows you to quickly copy the configuration between system.
Create or append to the .config/rclone/rclone.conf file in your home directory and populate it with the following example, replacing the placeholder text starting and ending with curly braces.
The {encoded-user-name} value should be your fully qualified username as shown on your profile page. Typically it would be something like oracleidentitycloudservice/john.doe@example.com. The value should then be encoded following the normal rules for encoding a username in a URL, resulting in oracleidentitycloudservice%2Fjohn.doe%40example.com.
The {encoded-token} value is the value of the Auth Token generated earlier. It should also be encoded following the normal rules for encoding a password in a URL.
[oci-swift]
type = swift
env_auth = false
auth_token = na
storage_url = https://{encoded-user-name}:{encoded-token}@swiftobjectstorage.{region-identifier}.oraclecloud.com/v1/{bucket-namespace}
The auth_token value doesn't matter as long as its set to something so that rclone doesn't think it needs to talk to a Swift authentication server. OCI generation 2 uses HTTP basic authentication instead of a Swift authentication server.
At this point everything should be fully configured.
If you have completed both the Swift and S3 configurations of this tutorial be aware that the buckets are the same regardless of which API you are using. You can create a bucket in S3 and then read it in Swift.
Test by listing out your available buckets using rclone.
rclone lsd oci-swift:
If the command doesn't work review the previous steps and repeat as needed.
You could copy the contents of the current direct to your rclone-demo bucket using:
rclone -v copy . oci-swift:rclone-demo
To delete the bucket and all its contents run:
rclone -v purge oci-swift:rclone-demo
Running rclone -v copy . oci-swift:rclone-demo again would recreate the bucket before uploading files to the bucket.
If you have started exploring the Compartment features of OCI, you should be aware that when using Swift API clients such as rclone the buckets that you create will be created in your SWIFT API Designated Compartment which by default is your root compartment. You can view the current value in the Tenancy Details page under your profile.